
Adenium, Backyard Gardening, Cactus & Succulent, Family & Kids' Gardening, Flower Seeds, Garden Planning & Design, Herb Seeds, Homesteading & Self-Reliance, Sensory & Wellness Gardening, Sustainable & Regenerative Living, The Horticulturist’s Lab, Urban & Small-Space Gardening, Vegetables
No-Dig Gardening: How to Build a Vegetable Garden Without Tilling the Soil
Aug
For generations, starting a vegetable garden often meant doing one thing first:
Digging.
Gardeners turned the soil with shovels.
Farmers used tillers.
New beds were cultivated, loosened, flipped, and broken apart before the first seed went into the ground.
But there is another way.
No-dig gardening is a method of growing vegetables, herbs, flowers, and other plants while disturbing the soil as little as possible.
Instead of repeatedly turning the soil, gardeners add organic materials such as compost and mulch to the surface and allow plant roots, soil organisms, moisture, and time to do much of the work.
The result can be a productive garden with:
- Less annual digging
- Better soil coverage
- Fewer disturbed weed seeds
- Improved soil structure over time
- More efficient water use
- Easier garden preparation
- A simpler transition from lawn to growing space
And fall is one of the best times to begin.
Build the bed now.
Allow the materials to settle.
Then plant into it when the next growing season arrives.
What Is No-Dig Gardening?
No-dig gardening is a soil-management approach that avoids routinely turning or tilling the entire growing area.
Instead of mixing organic matter deeply into the soil, gardeners generally apply it to the surface.
A typical no-dig bed might contain:
- Existing soil or lawn underneath
- Cardboard where weed suppression is needed
- Compost
- Organic mulch
- Seeds or plants growing from the upper layer
Over time, roots and soil organisms interact with those surface materials.
The garden develops from the top downward rather than being completely rebuilt with a tiller each season.
Is No-Dig the Same as No-Till?
The terms are closely related.
No-till is commonly used in agriculture and refers to growing crops with little or no soil tillage.
No-dig is more commonly used by home gardeners.
Both approaches share the idea of minimizing unnecessary soil disturbance.
A home gardener may still occasionally dig:
- A planting hole
- A root vegetable
- A stubborn perennial weed
- A tree or shrub location
- A drainage correction
No-dig does not mean you are forbidden from ever touching the soil with a shovel.
It means you stop turning the entire garden simply because that has always been the routine.
Why Stop Tilling the Garden?
Tillage can provide immediate benefits.
It can:
- Loosen compacted soil
- Remove existing vegetation
- Mix amendments
- Prepare a planting surface
But repeated disturbance also changes the soil.
A productive garden depends on more than loose dirt.
Healthy soil contains:
- Mineral particles
- Organic matter
- Water
- Air
- Roots
- Fungi
- Bacteria
- Insects
- Earthworms
- Other organisms
The objective of no-dig gardening is to create conditions where this soil system can remain more stable.
1. No-Dig Gardening Protects Soil Structure
Healthy soil contains pores and aggregates.
Those spaces allow:
- Water to enter
- Air to circulate
- Roots to grow
- Soil organisms to move
Repeated cultivation can break apart soil structure.
No-dig gardening attempts to reduce that disruption.
Instead of loosening the entire bed every season, the gardener allows roots and biological activity to gradually create structure.
This does not mean severely compacted soil magically fixes itself overnight.
Some difficult sites may need initial intervention.
But once a workable bed is established, repeated tilling may no longer be necessary.
2. No-Dig Gardening Can Reduce Weed Problems
Have you ever tilled a garden that looked fairly clean and then watched hundreds of tiny weeds appear?
Soil can contain many dormant weed seeds.
When the ground is turned, some buried seeds reach the surface where light, moisture, and temperature conditions allow them to germinate.
No-dig gardening leaves more of the soil profile undisturbed.
That does not eliminate weeds.
Seeds can still arrive by:
- Wind
- Birds
- Animals
- Compost
- Mulch
- Nearby plants
But avoiding unnecessary cultivation can reduce the continual movement of buried seeds toward the surface.
The easiest weed to remove is also the smallest one.
Pull young weeds before they become established and produce seed.
3. Mulch Helps Keep Soil Covered
Nature rarely leaves productive soil completely bare for long.
Plants grow.
Leaves fall.
Organic debris accumulates.
A no-dig garden uses the same general principle.
After planting, exposed soil can be protected with appropriate mulch.
Possible materials include:
- Straw
- Shredded leaves
- Finished compost
- Grass clippings used carefully
- Other locally appropriate organic materials
Mulch can help:
- Reduce evaporation
- Reduce soil splash
- Moderate soil temperature
- Suppress some weeds
- Add organic material as it decomposes
Do not pile mulch directly against vegetable stems or tree trunks.
4. No-Dig Gardening Can Help Conserve Moisture
Bare soil exposed to hot sun and wind can lose moisture quickly.
Covering the surface helps reduce direct evaporation.
Good soil structure can also improve how water enters and moves through the soil.
This is increasingly useful for gardeners dealing with:
- Summer heat
- Water restrictions
- Dry weather
- Expensive irrigation
- Rapidly drying raised beds
No-dig gardening does not mean you stop watering.
It means designing the soil and surface so the water you apply is used more efficiently.
5. It Can Reduce Physical Labor
Digging an entire garden every spring is hard work.
For a small bed, that may not be a major problem.
For a quarter-acre homestead or large vegetable garden, it can become significant.
No-dig systems shift the labor.
Instead of repeatedly turning soil, gardeners spend more time:
- Applying compost
- Mulching
- Managing pathways
- Planting
- Harvesting
- Controlling weeds early
You still work.
You simply stop doing some work that may not be necessary.
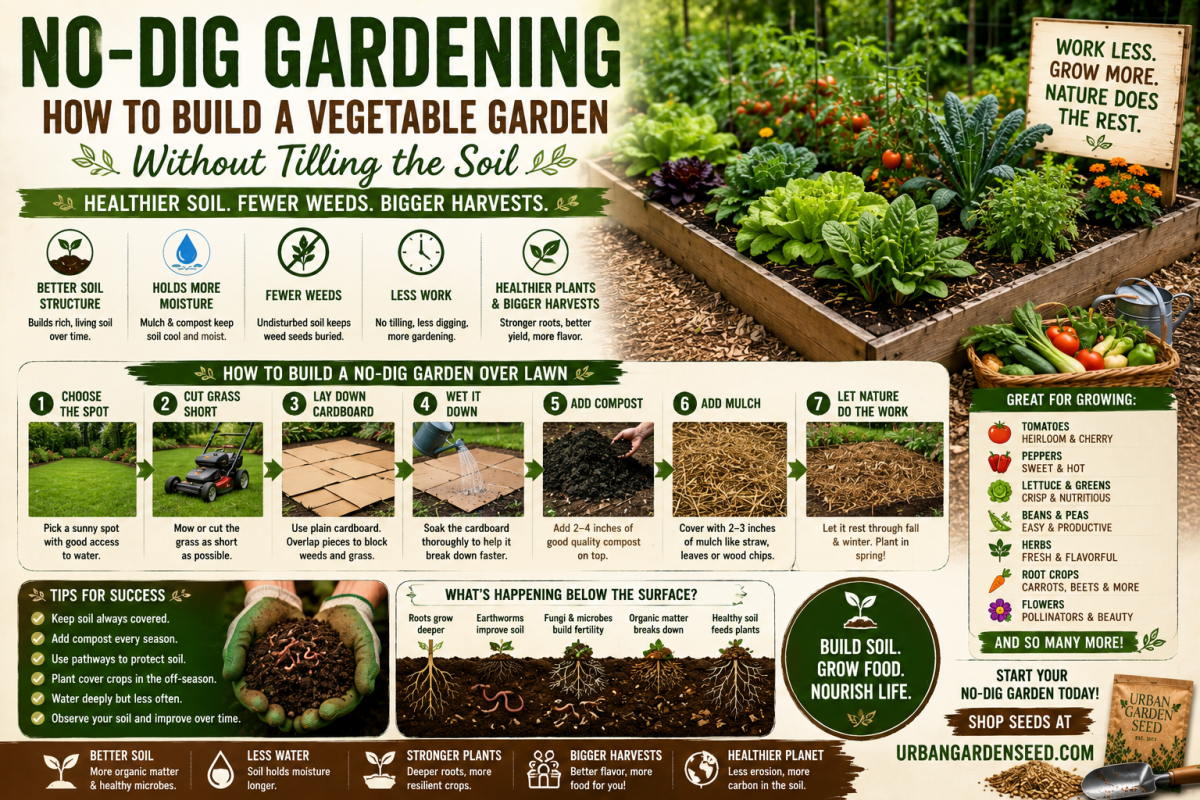
How to Start a No-Dig Garden Over Lawn
This is one of the most useful applications of the method.
You can convert part of an existing lawn into vegetable-growing space without removing every piece of sod by hand.
Step 1: Choose the Location
Most productive vegetables need substantial sunlight.
Before creating a permanent bed, observe the area.
Look for:
- Strong sunlight
- Reasonable drainage
- Easy water access
- Convenient harvesting access
Avoid creating a garden where standing water remains for long periods.
Also locate underground utilities before major landscape work.
Step 2: Mark the Bed
Use:
- Stakes
- String
- A garden hose
- Landscape paint where appropriate
Define the bed before laying materials.
For a garden you will work by hand, keep the bed narrow enough that you can reach the center without walking on the growing surface.
Permanent pathways are a major advantage of no-dig gardening.
You want to walk around the soil you grow in rather than repeatedly compacting it.
Step 3: Cut the Existing Vegetation Short
Mow or cut grass and weeds low.
Remove:
- Mature seed heads
- Woody debris
- Large aggressive weeds
Do not allow mature weeds filled with seeds to become the foundation of the new bed.
Step 4: Add Cardboard
Plain cardboard can be used as a temporary weed-suppressing layer when converting lawn.
Remove:
- Plastic tape
- Shipping labels where practical
- Staples
- Plastic coatings
Use ordinary brown corrugated cardboard rather than highly coated materials.
Overlap the edges.
Do not leave grass visible between pieces.
Gaps become pathways for grass to grow through.
Step 5: Wet the Cardboard
Moistening the cardboard helps:
- Hold it in place
- Begin the breakdown process
- Prevent wind from moving it
- Create better contact with the vegetation below
You do not need to turn the area into a pond.
Wet the material thoroughly enough to settle it.
Step 6: Add Compost
Apply a generous layer of quality finished compost above the cardboard.
The exact depth depends on:
- What you intend to grow
- Compost quality
- Whether you are planting immediately
- Existing soil conditions
If the bed will rest through fall and winter, the layers will settle over time.
If you intend to sow small seeds immediately, you need enough suitable growing material above the cardboard for their root systems to establish.
Step 7: Add Mulch
Where appropriate, add a surface mulch around or above the compost.
Possible choices include:
- Straw
- Leaves
- Other suitable organic material
If you are direct sowing tiny vegetable seeds immediately, keep the planting row clear enough for reliable seed-to-soil contact.
Do not bury small seeds under several inches of coarse mulch.
Step 8: Let the Bed Rest
Fall is an excellent time to construct a no-dig bed.
Why?
You may not need it immediately.
Rain, snow, moisture, microorganisms, and time can begin breaking down the cardboard and settling the organic layers.
By spring, the bed may be much easier to plant.
Can You Plant Immediately?
Yes, depending on how the bed was built.
For transplants, gardeners can open planting spaces through the upper compost layer and set plants into suitable growing material.
For large seeds such as beans, peas, squash, or cucumbers, planting can also be straightforward when the upper layer is deep enough.
Tiny direct-sown seeds require more attention.
Examples include:
- Carrots
- Lettuce
- Basil
- Many flowers
These need close contact with fine growing material.
Create a clean planting row rather than scattering tiny seeds over coarse mulch.
No-Dig Raised Beds
Existing raised beds are especially easy to convert.
You do not necessarily need cardboard if the bed already contains soil and weeds are under control.
At the end of the season:
- Remove problem weeds.
- Cut finished healthy plants near soil level where appropriate.
- Leave roots in place when practical.
- Add compost to the surface.
- Add mulch or a cover crop if appropriate.
- Plant again when the next season begins.
Instead of emptying, replacing, or aggressively turning the soil every year, keep building from the surface.
Should You Leave Vegetable Roots in the Soil?
Healthy roots can often remain after a crop is finished.
Cut the plant near the soil surface and allow the root system to decompose underground.
That root network can create channels and become organic material.
Examples might include finished:
- Beans
- Peas
- Lettuce
- Annual flowers
However, do not automatically leave roots from severely diseased plants.
Disease management sometimes requires removing infected plant material.
Use judgment rather than treating no-dig as an inflexible rule.
What About Tomato Plants?
At the end of tomato season, cut healthy plants near the base where appropriate rather than aggressively pulling every root from the soil.
Remove the above-ground plant.
If the plant showed serious disease, dispose of affected material according to appropriate disease-management guidance.
Then add compost and protect the bed for the off-season.
What About Root Vegetables?
Obviously, harvesting carrots means pulling a root from the ground.
No-dig gardening does not prohibit harvesting food.
Grow and harvest:
- Carrots
- Beets
- Radishes
- Turnips
- Potatoes
- Sweet potatoes
Normally.
After harvest, repair the disturbed surface with compost or mulch.
The goal is minimum necessary disturbance, not zero movement forever.
No-Dig Potatoes
Potatoes are especially interesting in reduced-disturbance systems.
Rather than deeply trenching soil, some gardeners establish seed potatoes relatively shallowly and cover them with organic material.
The exact method depends on:
- Climate
- Soil
- Potato variety
- Mulch material
Do not assume every no-dig potato technique works equally well in every environment.
Heavy, wet materials can create problems in poorly drained conditions.
Experiment with a small area first.
Compost Is Important—but More Is Not Always Better
One of the biggest misunderstandings in no-dig gardening is that you must continually dump enormous quantities of compost onto the garden.
Compost contributes organic matter and nutrients.
But it can also contain significant phosphorus and other nutrients.
Applying thick layers year after year without understanding your soil can lead to nutrient accumulation.
Use soil testing.
A garden that already has high fertility may need less compost than a newly created bed.
Healthy soil management is not about maximizing every input.
It is about applying what the soil actually needs.
No-Dig Gardening and Cover Crops
No-dig methods work extremely well alongside cover cropping.
Instead of leaving beds bare between vegetables, grow plants that protect and feed the soil.
Depending on season and region, options can include:
- Oats
- Field peas
- Clover
- Cereal rye
- Other suitable cover crops
Terminate the cover crop appropriately before planting vegetables.
Some cover crops winterkill.
Others survive into spring and require deliberate management.
Cover crops add something mulch alone cannot provide:
Living roots.
No-Dig Gardening and Crop Rotation
Reducing soil disturbance does not eliminate the need for crop planning.
Continue rotating plant families when practical.
For example, avoid planting the same disease-prone crop in exactly the same location year after year.
Think about rotations among:
- Tomatoes and peppers
- Beans and peas
- Brassicas
- Cucurbits
- Root crops
- Leafy greens
No-dig describes how you manage soil.
Crop rotation describes how you manage plants.
The two work together.
Best Vegetables for a No-Dig Garden
Almost any common garden vegetable can grow in a properly prepared no-dig bed.
Excellent choices include:
Tomatoes
Plant transplants into rich compost and mulch after establishment.
Peppers
Warm-season plants benefit from soil protected against unnecessary moisture loss.
Beans
Easy to direct sow into prepared rows.
Peas
Excellent for cool-season growing.
Lettuce
Works well when fine compost is available at the surface.
Kale
Can be transplanted or directly sown.
Cucumbers
Grow vertically to combine no-dig soil management with space efficiency.
Squash
Provide enough room for mature vines.
Swiss chard
A productive crop with a long harvest period.
Radishes
Useful for filling small open spaces between larger plantings.
Planting Seeds in a No-Dig Bed
Seeds still require correct planting depth.
A no-dig bed does not change seed biology.
For small seeds:
- Pull coarse mulch away from the planting row.
- Expose fine compost or soil.
- Create a shallow row.
- Sow according to the seed’s requirements.
- Water gently.
- Keep the seed zone consistently moist.
For larger seeds:
Create appropriate planting holes or furrows through the top layer.
Once seedlings become established, return mulch around them where useful.
No-Dig Garden Pathways
Permanent paths are important.
They separate:
Growing space from walking space.
This reduces compaction in the beds.
Possible pathway materials include:
- Wood chips
- Straw
- Gravel
- Mowed grass
- Other suitable local materials
Design paths wide enough for:
- Wheelbarrows
- Harvest baskets
- Watering
- Comfortable access
A garden that is easy to move through is easier to maintain.
Can You Use Wood Chips?
Wood chips can be excellent for:
- Pathways
- Around perennial plants
- Orchard areas
- Some garden-bed surfaces
But fresh coarse wood chips are generally better used as surface mulch rather than mixed deeply into vegetable-bed soil.
Allow decomposition to occur from the surface.
Do not repeatedly till coarse woody material into the root zone.
Can Leaves Be Used?
Yes.
Autumn leaves are one of the most useful free garden materials.
Shred them if possible.
A thick mat of whole leaves can sometimes repel water or blow away.
Shredded leaves settle more evenly and decompose faster.
Use them:
- Around crops
- Over empty beds
- In compost
- On pathways
- Around perennials
Your fall cleanup can become next year’s soil resource.
What About Grass Clippings?
Grass clippings can be useful mulch if:
- The lawn has not recently been treated with inappropriate herbicides
- The grass is not filled with mature weed seeds
- The clippings are used in manageable layers
Thick piles of fresh grass can become slimy and anaerobic.
Apply thinner layers and allow some drying.
No-Dig Gardening in Clay Soil
Gardeners with heavy clay often ask whether no-dig can work.
It can.
But expectations matter.
Surface compost and living roots can help improve structure gradually.
However, severe compaction or drainage problems may require initial correction.
Do not build an expensive vegetable garden over a site that remains flooded.
Fix major drainage problems first.
Then use reduced-disturbance practices to maintain the improved soil.
No-Dig Gardening in Sandy Soil
Sandy soils present the opposite challenge.
They drain rapidly and may hold less water and nutrients.
Adding organic matter to the surface can help increase moisture and nutrient retention over time.
Mulch becomes especially valuable during hot weather.
Again, soil testing is useful.
Do not assume sandy soil automatically needs huge quantities of every amendment.
Can a No-Dig Garden Be Organic?
Yes.
No-dig is compatible with organic gardening, but the two terms do not mean the same thing.
A gardener can practice no-dig while using conventional fertilizer.
Another gardener can use organic inputs.
No-dig describes soil disturbance, not the complete production system.
If your goal is organic gardening, evaluate:
- Seeds
- Fertilizers
- Pest-management products
- Compost sources
- Mulches
accordingly.
Common No-Dig Gardening Mistakes
Mistake 1: Using too little cardboard
Grass grows through gaps.
Overlap edges.
Mistake 2: Leaving plastic tape on boxes
Remove non-compostable material first.
Mistake 3: Applying poor-quality compost
The upper layer becomes your primary growing environment.
Use appropriate compost.
Mistake 4: Walking on garden beds
Create permanent paths.
Mistake 5: Adding excessive compost every year
Use soil-test information.
Mistake 6: Assuming no-dig means no weeds
Weeding still exists.
Mistake 7: Assuming no-dig means no work
It reduces certain tasks, not all tasks.
Mistake 8: Ignoring serious compaction
Some sites require initial correction.
Mistake 9: Smothering tiny seeds with mulch
Clear planting rows.
Mistake 10: Treating cardboard as a permanent barrier
Cardboard is used as temporary organic weed suppression.
It breaks down.
That is the point.
No-Dig vs. Traditional Tilling
Traditional cultivation can be useful in certain situations.
No-dig is not a religion.
Use the method that solves the actual problem.
Traditional tillage may make sense when:
- Opening very compacted land
- Correcting a serious soil issue
- Managing certain crop residues
- Preparing larger commercial acreage
- Addressing specific weed problems
No-dig is especially attractive when:
- The garden is already established
- Soil structure is improving
- You want less annual labor
- You want permanent beds
- You are converting lawn
- You want to reduce repeated disturbance
The strongest gardening method is not always the most extreme one.
Use targeted disturbance when necessary.
Avoid unnecessary disturbance when it is not.
A Simple First-Year No-Dig Plan
August–September
Choose the location.
Measure the beds.
Begin collecting plain cardboard.
Order seeds for upcoming fall and spring crops.
September–October
Cut existing grass.
Lay cardboard.
Add compost.
Cover exposed surfaces.
Fall
Plant suitable cool-season crops if your growing season allows.
Otherwise, let the bed settle.
Winter
Allow moisture and decomposition to work.
Plan your spring crop rotation.
Early Spring
Inspect the bed.
Add additional compost only if needed.
Pull mulch away from direct-sowing rows.
Spring
Plant:
- Lettuce
- Peas
- Radishes
- Kale
- Other suitable cool-season crops
After Frost
Add:
- Tomatoes
- Peppers
- Beans
- Cucumbers
- Squash
- Warm-season herbs and flowers
The garden begins producing without ever being rototilled.
Turn Lawn Into Food
A lawn produces one primary crop:
Grass.
A vegetable bed can produce:
- Tomatoes
- Beans
- Lettuce
- Peppers
- Cucumbers
- Herbs
- Flowers
- Storage crops
- Seeds for future seasons
You do not have to remove every lawn.
Keep the sections your household actually uses.
Then look at areas that serve little purpose.
A sunny 4-by-12-foot strip can become a productive vegetable bed.
A corner can become an herb garden.
An unused side yard can grow beans or flowers.
Start with one section.
Why Seeds Work So Well in No-Dig Gardens
Once the bed is established, starting from seed gives you enormous flexibility.
You can grow:
- Multiple lettuce varieties
- Unusual tomatoes
- Heirloom beans
- Flowers between vegetables
- Herbs
- Root crops
- Pollinator plants
- Cover crops
Seeds make it possible to fill every layer and season of a productive garden.
Spring.
Summer.
Fall.
Even winter cover.
Instead of redesigning the soil every year, redesign what you grow.
Why Choose Urban Garden Seed?
Urban Garden Seed offers seeds for home gardeners, homesteaders, growers, and plant enthusiasts across the United States.
Our collections include:
- Vegetable seeds
- Flower seeds
- Herb seeds
- Fruit seeds
- Tree seeds
- Plant seeds
- Ground-cover seeds
- Specialty varieties
For a no-dig garden, start by choosing crops appropriate for your climate, sunlight, season, and available space.
Use quality seeds.
Protect the soil.
Maintain living roots whenever practical.
And build fertility over time rather than treating every growing season as a complete restart.
Build Soil Instead of Rebuilding the Garden
A productive garden does not need to begin every spring with a roaring rototiller.
It can begin much more quietly.
A layer of compost.
A covering of mulch.
Roots from last year’s crops decomposing underground.
Earthworms moving through the soil.
Seeds planted into the surface.
Rain soaking downward.
Then new growth.
No-dig gardening changes the gardener’s role.
Instead of repeatedly tearing the system apart and rebuilding it, you begin managing a living soil that develops year after year.
Ready to Grow?
Explore vegetable, herb, flower, ground-cover, and specialty seeds at UrbanGardenSeed.com.
Choose what you want to harvest.
Build the bed.
Protect the soil.
Then let your garden improve with every growing season.
Dig less. Protect more. Grow better.
Frequently Asked Questions
What is no-dig gardening?
No-dig gardening is a method of growing plants while minimizing routine soil disturbance. Compost and organic materials are generally applied at the surface rather than repeatedly tilled into the soil.
Can I start a no-dig garden over grass?
Yes. Lawn can be smothered with overlapping cardboard and covered with compost or mulch to create a new planting area.
What kind of cardboard should I use?
Use plain corrugated cardboard with plastic tape, staples, and non-compostable coatings removed.
How deep should compost be in a no-dig garden?
The appropriate amount depends on whether you are building a new bed, planting immediately, the existing soil, and compost quality. Avoid assuming that extremely thick annual applications are always beneficial.
Can I plant seeds directly into a no-dig garden?
Yes. Move coarse mulch away from the planting row and sow seeds into fine compost or soil at the appropriate depth.
Does no-dig gardening eliminate weeds?
No. It can reduce some weed pressure, but weeds still arrive and require management.
Do I need to till clay soil first?
Not always. However, severely compacted soil or drainage problems may require initial intervention before a long-term no-dig system is established.
Can I use leaves in a no-dig garden?
Yes. Shredded fall leaves can be useful as mulch or compost material.
Can I grow tomatoes in a no-dig garden?
Yes. Tomatoes, peppers, beans, lettuce, kale, cucumbers, squash and many other vegetables can grow successfully in properly prepared beds.
Are raised beds suitable for no-dig gardening?
Yes. Existing raised beds are particularly easy to manage using surface composting and minimal disturbance.
Is no-dig gardening the same as organic gardening?
No. No-dig refers primarily to minimizing soil disturbance. Organic gardening describes a broader set of production practices and allowed inputs.
Can no-dig gardening work on a homestead?
Yes. Permanent reduced-disturbance beds can be used in backyard gardens, homesteads, market gardens, and other vegetable-growing systems.
Where can I buy seeds for a no-dig vegetable garden?
Visit UrbanGardenSeed.com to explore vegetable, herb, flower, ground-cover, and specialty seeds for your next growing season.
