
Cactus & Succulent, Family & Kids' Gardening, Flower Seeds, Herb Seeds, Sensory & Wellness Gardening, Sustainable & Regenerative Living, The Horticulturist’s Lab, Urban & Small-Space Gardening, Vegetables
How to Grow Microgreens at Home: The 10-Day Urban Garden Hack
Jun
Want to add a massive punch of flavor, crunch, and nutrition to your meals, but don’t have the space for a full backyard garden? You don’t need a greenhouse to grow your own food. With a sunny windowsill and a few basic supplies, you can cultivate a thriving indoor crop in just over a week.
Welcome to the 10-Day Urban Garden Hack. Whether you are a culinary enthusiast or a beginner with a less-than-green thumb, this step-by-step guide will show you exactly how to grow premium microgreens right on your kitchen counter using seeds from Urban Garden Seed.
Why Grow Microgreens?
Microgreens are the tiny, immature leaves of vegetables and herbs. Don’t let their size fool you; they are mighty in both taste and health benefits.
- Speed: You go from seed to plate in just 10 to 14 days.
- Space-Saving: Perfect for apartments, condos, and small urban kitchens.
- Nutrient-Dense: These tiny shoots are packed with concentrated vitamins, minerals, and antioxidants.
- Flavor-Packed: They offer an intense burst of flavor—from peppery arugula to nutty sunflowers—that elevates any dish.
The Essential Urban Garden Checklist
Before we start the clock, you need the right setup. Here is exactly what you need to succeed:
| Item | Description |
| Premium Seeds | High-quality, untreated seeds sourced directly from urbangardenseed.com. |
| Growing Trays | Shallow trays (1-3 inches deep); you will need one with drainage holes and one without. |
| Growing Medium | A sterile potting soil, seed-starting mix, or coconut coir. |
| Light Source | A sunny, south-facing window or a basic LED grow light. |
| Spray Bottle | For gentle misting during the crucial early days. |
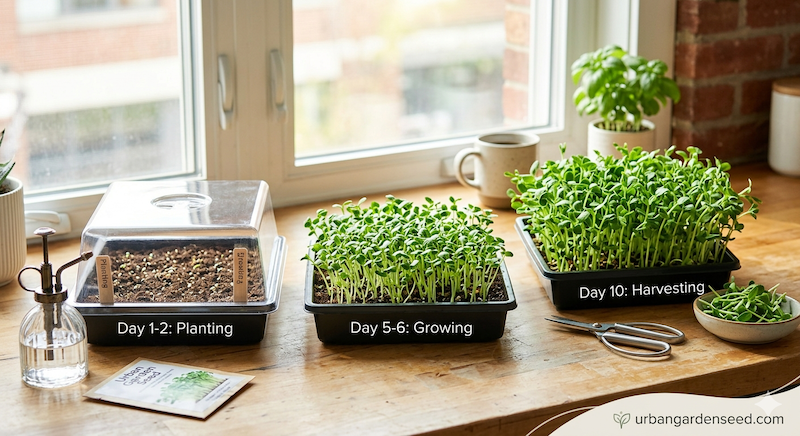
The 10-Day Growth Timeline
Follow this simple, day-by-day progression to ensure a lush, vibrant canopy of greens.
Day 1: Sowing
The foundation of a great harvest starts with proper planting.
- Prep: Fill your drainage tray with 1-2 inches of your chosen growing medium and lightly moisten it.
- Soak: For larger varieties like sunflowers and peas, soak the seeds in cold water for 4 to 8 hours prior to planting to boost germination.
- Sow: Evenly scatter your seeds across the soil surface—they should be dense, but not piled on top of each other. Gently press them into the soil.
- The Blackout: Mist the seeds thoroughly, then cover them with an empty tray or a humidity dome to block out the light. This blackout period forces the seeds to root downward and the stems to stretch upward.
Day 4: Sprouting (Spotlight on Arugula)
By day 4, the magic is happening. Most seeds will sprout between 2 and 7 days after planting.
- Uncover: Remove the blackout cover permanently once the sprouts have taken root. The pale, yellowish sprouts will quickly turn vibrant green once exposed to light.
- Let There Be Light: Move your tray to a sunny spot or place it under a grow light. Microgreens require at least 6 to 8 hours of light each day to photosynthesize and thrive.
- Mist: Continue to mist the soil 1 to 2 times a day, keeping the surface damp but never soggy.
Day 7: Established (Spotlight on Radish)
Your greens are now establishing their root systems and developing their first tiny leaves.
- Switch to Bottom Watering: Once roots begin to appear at the bottom of the tray, stop misting from the top to prevent mold. Instead, pour water into the bottom, solid tray, allowing the soil to soak it up through the drainage holes.
- Airflow: Introduce a gentle-blowing fan to keep air circulating around your crop, which is crucial for preventing fungal issues.
Day 10: Ready to Harvest! (Spotlight on Sunflowers & Peas)
It’s harvest day! At this stage, your microgreens should be 2 to 3 inches tall, crisp, and fully formed.
- The Cut: Gently grab a cluster of greens and use sharp, long-bladed scissors to snip the stems just above the soil line.
- Clean Up: Once harvested, microgreens will not grow back. Compost the used soil and root mat, sanitize your trays, and get ready for your next batch!
3 Pro-Tips for a Bountiful Harvest
- Keep it Cozy: Microgreens grow best in a stable environment. Aim for temperatures between 65 and 70 degrees Fahrenheit with 40% to 60% humidity.
- Don’t Over-Saturate: Consistent moisture is key, but standing water is the enemy. Always allow excess water to drain completely.
- Start Small: Master the basics—like seed density and watering—with a few trays of easy-to-grow varieties (like radish or arugula) before scaling up your indoor garden.
Start Your Urban Garden Today
Ready to transform your countertop into a thriving, edible landscape? Head over to Urban Garden Seed to browse our premium selection of beginner-friendly microgreen seeds and curated starter kits.
