
Adenium, Backyard Gardening, Cactus & Succulent, Family & Kids' Gardening, Flower Seeds, Garden Planning & Design, Herb Seeds, Homesteading & Self-Reliance, Sensory & Wellness Gardening, Sustainable & Regenerative Living, The Horticulturist’s Lab, Urban & Small-Space Gardening, Vegetables
How to Save Seeds From Your Garden: Tomatoes, Peppers, Beans, Flowers & More
Aug
Your garden may be producing more than vegetables and flowers right now.
It may also be producing next year’s garden.
Every ripe tomato, mature pepper, dried bean pod, sunflower head, and fading zinnia can contain seeds capable of continuing the growing cycle into another season.
Seed saving is one of gardening’s oldest skills.
And late summer through fall is one of the best times to learn it.
Instead of throwing mature plants into the compost pile after harvest, gardeners can collect selected seeds, dry them properly, label them, and store them for future planting.
But not every seed should be saved.
Some vegetables are much easier than others.
Some varieties reproduce predictably.
Others may give completely unexpected results.
This guide explains exactly where beginners should start.
What Is Seed Saving?
Seed saving means collecting mature seeds from plants you have grown, preparing them correctly, and storing them for planting during a future growing season.
The process can be surprisingly simple.
For some plants, you wait for a pod or flower head to dry, collect the seeds, and store them.
Other crops—particularly tomatoes—need additional processing.
Seed saving can help gardeners:
- Preserve favorite varieties
- Maintain family heirlooms
- Grow plants selected from their best performers
- Reduce waste
- Learn more about plant reproduction
- Build a personal seed collection
- Share varieties with friends and family
But successful seed saving begins with choosing the right plants.
Start With Open-Pollinated Seeds
Before saving anything, determine whether the variety you planted is open-pollinated or hybrid.
This distinction matters.
Open-pollinated varieties
When properly pollinated and isolated when necessary, open-pollinated varieties can produce offspring that remain relatively similar to the parent plants.
Many heirloom varieties are open-pollinated.
That is why heirloom and open-pollinated seeds are popular among gardeners interested in saving seed.
Hybrid varieties
F1 hybrid plants can produce viable seed.
However, the next generation may display a mixture of traits from the hybrid’s parent lines.
The resulting plants may differ in:
- Size
- Flavor
- Color
- Yield
- Growth habit
- Disease resistance
- Maturity
So while you can save seed from many hybrid plants, you should not expect the next generation to reproduce the original hybrid exactly.
For predictable seed saving, begin with clearly labeled open-pollinated varieties.
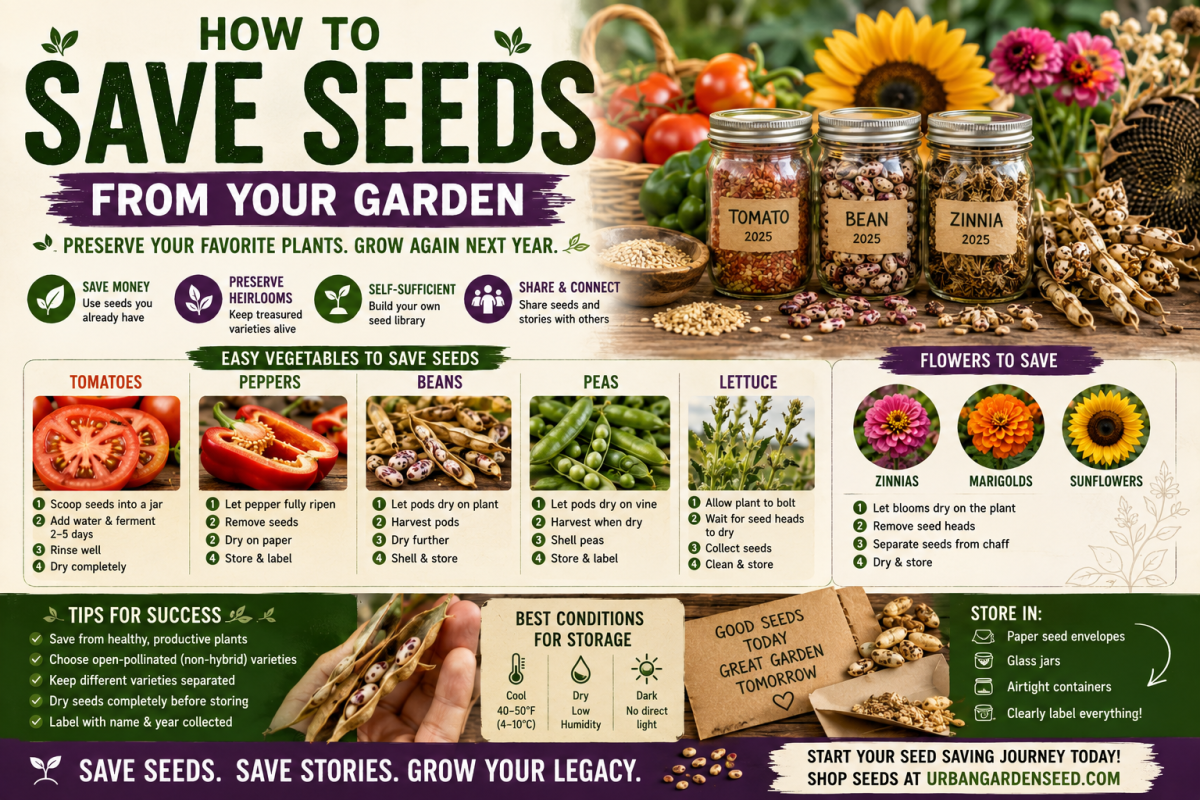
The Easiest Vegetables for Saving Seeds
Beginners should start with crops that are relatively straightforward.
Excellent choices include:
- Tomatoes
- Peppers
- Beans
- Peas
- Lettuce
Tomatoes, peppers, beans, and peas are particularly approachable because they are primarily self-pollinating and usually require less complicated isolation than crops such as squash or corn.
For flowers, good beginner choices include:
- Zinnias
- Marigolds
- Sunflowers
- Calendula
- Cosmos
The specific harvesting technique varies, but the basic principle is the same:
Let the seed become fully mature before collecting it.
Save Seeds From Your Best Plants
Do not simply save seeds from whatever plant happens to be closest.
Think like a plant breeder.
Look across the garden.
Which plants performed best?
Consider saving seed from plants that demonstrated desirable qualities such as:
- Strong growth
- Excellent flavor
- Good productivity
- Attractive flowers
- Strong plant structure
- Healthy foliage
- Appropriate maturity time
Avoid deliberately saving seed from weak, severely diseased, or obviously abnormal plants.
Some plant diseases can be carried on or in seed, which is one reason University Extension guidance recommends collecting from healthy plants whenever possible.
Your next generation begins with the parents you select.
How to Save Tomato Seeds
Tomatoes are one of the best crops for learning seed saving.
But you cannot simply scoop seeds onto a paper towel and assume the job is finished.
Fresh tomato seeds are surrounded by a gelatinous coating.
Fermentation helps break down that material before drying.
Step 1: Choose a fully ripe tomato
Select a healthy fruit from a healthy open-pollinated plant.
Allow it to reach full maturity.
Step 2: Scoop out the seeds
Cut the tomato and squeeze or scoop the seeds and surrounding gel into a small glass or jar.
Step 3: Add a little water
Add enough water to allow the seeds and pulp to move freely.
Step 4: Allow fermentation
Leave the mixture for a few days.
Swirl or stir it periodically.
During fermentation, viable seeds will generally settle toward the bottom.
University of Minnesota advises that this process should occur within about five days.
Step 5: Rinse
Pour away the floating pulp and rinse the remaining seeds thoroughly.
A fine strainer can make this easier.
Step 6: Dry completely
Spread the clean seeds in a single layer.
Allow them to dry completely before storage.
Moist seeds stored too early can develop mold.
Step 7: Label
Write down:
- Tomato variety
- Year collected
- Any useful notes
Never trust yourself to remember six months later.
You probably will not.
How to Save Pepper Seeds
Peppers are even easier.
Step 1: Let the pepper fully mature
If you normally harvest a pepper green, leave selected fruits on the plant longer.
Seed intended for saving should come from mature fruit.
University of Minnesota recommends leaving selected peppers until they are fully ripe and beginning to wrinkle.
Step 2: Open the fruit
Cut the pepper carefully.
If working with hot peppers, wear gloves and avoid touching your eyes or face.
Step 3: Remove the seeds
Separate mature seeds from the interior.
Step 4: Dry
Spread them into a single layer and allow them to dry thoroughly.
Step 5: Store and label
Record the variety and year.
Because peppers can cross-pollinate under some circumstances, gardeners trying to maintain a very pure named variety may need more deliberate isolation.
For ordinary home experimentation, start with one favorite open-pollinated pepper and learn from the results.
How to Save Bean Seeds
Beans may be one of the easiest seeds of all.
The secret is simple:
Do not harvest the selected pods for eating.
Instead, leave them on the plant.
Let the pods mature
Wait until the pods become dry and brown.
The seeds inside should be firm and mature.
You may even hear them rattling inside the pods.
This can occur weeks after the stage when you would normally harvest green beans.
Collect the pods
Bring mature pods into a dry, protected location.
Let them dry further
University of Minnesota recommends allowing harvested pods additional drying time before shelling.
Shell the beans
Open each pod and remove the mature seeds.
Discard obviously damaged, moldy, or unhealthy seeds.
Store
Label the variety and year.
Beans are excellent for children learning seed saving because the seeds are large, easy to handle, and easy to see.
How to Save Pea Seeds
Saving peas works much like saving beans.
Instead of harvesting pods while they are sweet and tender, leave selected pods on the vine.
Allow them to mature and dry.
When the pods become dry and papery, harvest them.
Finish drying them indoors if necessary.
Then shell the peas and store the dry seed.
Peas and beans are especially useful beginner crops because the seed itself is the familiar part of the plant gardeners already recognize.
How to Save Lettuce Seeds
Lettuce requires a different approach.
Normally, gardeners harvest lettuce before it flowers.
For seed saving, you must let the plant continue its life cycle.
Eventually, lettuce will bolt.
The central stem becomes taller.
Flowers form.
Those flowers eventually develop seed.
What to do
Choose several healthy open-pollinated lettuce plants.
Stop harvesting them heavily.
Allow the plants to flower.
Wait until mature seed structures become dry.
Collect the seeds before too much is lost to wind or weather.
Because lettuce occupies garden space longer when grown for seed, designate specific plants for the project rather than trying to harvest every plant for salads.
How to Save Zinnia Seeds
Zinnias are excellent flowers for beginning seed savers.
Instead of deadheading every faded bloom, leave several of your best flowers on the plants.
Allow the flower heads to mature and dry.
Once fully dry:
- Remove the flower head.
- Pull it apart over a clean surface.
- Separate mature seeds from the dried flower material.
- Allow the seeds additional drying time if necessary.
- Store in a labeled envelope.
Illinois Extension includes zinnias among relatively easy annual flowers for beginner seed saving.
Choose flowers whose:
- Color
- Size
- Shape
- Plant vigor
you particularly enjoyed.
The offspring may vary if different varieties cross-pollinated nearby, which can also make the next generation interesting.
How to Save Marigold Seeds
Marigolds are another simple flower for seed collecting.
Let selected blooms remain on the plant until the flower heads turn brown and dry.
Remove a dried flower head and break it apart.
Inside, you will find elongated seeds.
Separate the seeds from the dried petals and debris.
Let them dry completely.
Then label and store.
One healthy marigold plant can produce far more seed than most families need for the following year.
Share extras.
How to Save Sunflower Seeds
Sunflowers offer an obvious seed harvest.
Allow the flower head to mature fully.
Seeds develop within the central disk.
Depending on your objective, birds may become competitors.
If you want seed specifically for replanting, protect selected mature heads before wildlife removes everything.
Once the head and seeds are mature:
- Remove the head
- Dry it further if needed
- Rub or loosen the seeds
- Separate debris
- Dry seeds completely before storage
If you are growing several sunflower varieties, expect possible cross-pollination.
Saved offspring may not look exactly like the original plant.
That can be part of the experiment.
Which Seeds Are Harder to Save?
After mastering tomatoes, peppers, beans, peas, lettuce, and easy flowers, you can move into more complicated crops.
Some plants cross-pollinate much more readily.
Examples include:
- Corn
- Cucumbers
- Squash
- Pumpkins
- Melons
- Gourds
Insects can move pollen among compatible cucumber, melon, squash, pumpkin, and gourd varieties, while wind can carry corn pollen considerable distances.
Cross-pollination usually does not change the fruit you are currently eating.
The surprise appears in the next generation grown from saved seed.
That pumpkin may produce something quite different the following year.
Serious seed preservation therefore requires understanding:
- Plant families
- Species
- Pollination methods
- Isolation distances
- Population size
Beginners do not need to solve all of that on day one.
Start simple.
Dry Seeds vs. Wet Seeds
Understanding these two categories makes seed saving easier.
Dry seeds
These mature in pods, flower heads, or other dry structures.
Examples include:
- Beans
- Peas
- Lettuce
- Many flowers
The usual process is:
Mature → harvest → dry → clean → store
Wet seeds
These develop inside fleshy fruits.
Examples include:
- Tomatoes
- Cucumbers
- Melons
Some wet seeds need extra cleaning or fermentation before drying.
University of Minnesota specifically distinguishes dry seeds from wet seeds and notes that wet seeds require more processing before storage.
The Most Important Rule: Seeds Must Be Dry
Seeds stored while damp can mold and deteriorate.
Do not rush storage.
After cleaning:
- Spread seeds thinly
- Keep them in a dry location
- Allow good airflow
- Keep varieties separate
Only package them when you are confident they are dry.
Illinois Extension emphasizes complete drying before storage because excess moisture increases the risk of mold or premature germination.
How to Store Saved Seeds
The enemies of stored seeds are primarily:
Heat and moisture.
A practical home seed collection can use:
- Paper seed envelopes
- Small labeled packets
- Airtight containers once seeds are thoroughly dry
- Glass jars
Write clearly on every packet:
Crop
Variety
Year collected
Optional notes might include:
- Best-tasting plant
- Earliest tomato
- Largest flower
- Drought survivor
- Highest yield
University of Minnesota recommends storing thoroughly dry seeds in tightly sealed containers under cool conditions and labeling them with variety and collection date.
Do not put damp seed into an airtight jar.
Dry first.
Seal second.
Build Your Own Seed Library
After several seasons, seed saving can turn a box of packets into a personal record of your garden.
Organize seeds by category:
Vegetables
- Tomatoes
- Peppers
- Beans
- Peas
- Lettuce
Herbs
- Basil
- Dill
- Cilantro
- Other suitable annual herbs
Flowers
- Zinnias
- Marigolds
- Sunflowers
- Cosmos
- Calendula
Then organize by year.
Every winter, review what you have.
Ask:
- What do I want to grow again?
- Which seeds are becoming old?
- Which varieties performed best?
- What new varieties should I buy?
Seed saving does not mean never purchasing seeds again.
It changes how you build your collection.
You preserve favorites while adding new genetics, colors, flavors, flowers, and crops over time.
When Should You Buy Fresh Seed Instead?
There are several situations where starting fresh is the smarter decision.
Consider purchasing new seed when:
- You want a new variety
- Your saved seed came from an F1 hybrid and predictability matters
- Plants were severely diseased
- Cross-pollination probably occurred
- Germination has declined
- You lost the variety label
- You want to expand genetic diversity
- You are starting a crop you have never grown before
Even experienced seed savers regularly purchase seed.
The goal is not to eliminate seed buying.
The goal is to understand the complete seed cycle.
Start With High-Quality Open-Pollinated Seeds
If saving seed is one of your gardening goals, begin by choosing varieties suitable for it.
Look for clearly labeled:
- Open-pollinated varieties
- Heirloom varieties
- Untreated seeds when preferred
- Varieties appropriate for your climate
Do not assume that Non-GMO automatically means open-pollinated.
Non-GMO, heirloom, hybrid, organic, and untreated describe different characteristics.
Read product descriptions carefully.
Common Seed-Saving Mistakes
Saving seed from an unknown hybrid
The next generation may be unpredictable.
Collecting immature seeds
Seeds need to reach biological maturity.
Saving from unhealthy plants
Disease can sometimes travel with seed.
Storing seeds while damp
This encourages mold and deterioration.
Forgetting labels
Mystery seeds are entertaining once.
After that, they become frustrating.
Assuming all plants self-pollinate
Many do not.
Expecting squash and pumpkins to remain perfectly true without isolation
Compatible plants can cross.
Saving only one seed
A larger sample gives you more options and helps maintain diversity.
A Simple Beginner Seed-Saving Plan
If this is your first year, do not save seed from the entire garden.
Choose just four projects:
Tomato
Learn wet-seed fermentation.
Pepper
Learn simple fleshy-fruit seed collection.
Beans
Learn dry-pod seed saving.
Zinnia or marigold
Learn flower-seed collection.
Those four crops teach most of the basic techniques you need before moving into more complicated species.
Why Seed Saving Starts With Seed Selection
The seed-saving process does not begin at harvest.
It begins when you purchase the original packet.
If you know that you want to save seed later, choosing open-pollinated or heirloom varieties from the beginning makes the process much easier.
Urban Garden Seed offers a broad selection of:
- Vegetable seeds
- Flower seeds
- Herb seeds
- Fruit seeds
- Tree seeds
- Specialty varieties
When your goal is future seed saving, look specifically for varieties clearly identified as open-pollinated or heirloom and check the individual product information before ordering.
One Seed Can Become Many Seasons
A tomato seed can become a plant.
That plant can produce dozens of tomatoes.
One tomato can contain dozens—or even hundreds—of seeds.
And those seeds can begin another generation.
That cycle is one of the most remarkable parts of gardening.
You are not simply harvesting food or flowers.
You are participating in the continuation of the plant itself.
This fall, before pulling every finished plant from the garden, look more closely.
There may be next year’s garden hiding inside it.
Ready to Start Your Next Growing Cycle?
Explore vegetable, flower, herb, and specialty varieties at UrbanGardenSeed.com.
Choose plants you want to grow.
Discover new varieties.
And if seed saving is part of your goal, begin with high-quality open-pollinated or heirloom seeds that can become part of your garden for seasons to come.
Plant. Harvest. Save. Grow again.
